Check out our Text & Graphics Playlist for more tutorials like this!
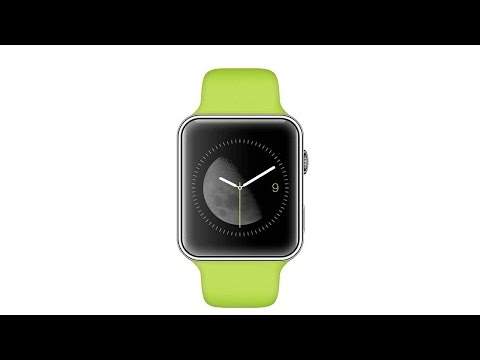
Have you ever had an idea for a product but didn't know the exact steps to take after sketching out your idea? Well in today's episode, we show you a possibility for your next step. You can create your product in photoshop. Learn how to render an apple watch from scratch in today's episode!
Section 1: Creating the Watch Inner Surface (3:32)
We kick things off by creating the inner surface of the watch. In this section, the Rounded Rectangle Tool will become your best friend. This tool gives us the options to really make the corners on our rounded rectangle smooth and precise. The Layer Style options also come in handy because it allows us to create that inner glow. This give the illusion of a shiny surface. The Rounded Rectangle Tool is even used to create the shine we see surrounding our inner surface.
Section 2: Creating the Watch Case (10:52)
Now that we have an inner surface created, we begin to work on the case that would be holding our inner surface. Our goal in mind was to create a shiny, metal crown surrounding our inner surface. The Rounded Rectangle Tool is the hero again in this section as we perfectly outline a case for our inner surface. We return to our Layer Style options to give our case a metal look. We also use the Rounded Rectangle Tool to create the buttons on the side of the watch. Then we get really fancy and use some Step and Repeat methods to create the grooves in the dial.
Section 3: Creating the Watch Strap (23:10)
The watch straps are created with a slightly different method. First we begin with a rough sketch to give us an idea of what we want. Then we use the pen tool to create one side of the strap. After we are satisfied with the side of the strap, we duplicate that layer, flip it over, and move it to finish off the strap on top of the watch face. Then we duplicate that layer, flip it over upside down, and use it for the bottom strap. (This might sound confusing but it's easier than you think.) We use Layer Style to give the straps a bit of dimension. This makes them appear as though they are pieces of rubber.
Section 4: Creating the Watch Face (31:00)
Now the fun part begins. The cool thing about apple watches is that the face of the watches vary. So we were able to get a bit creative in this section. We started by using the Step and Repeat method to create the second hand markers. Then we used some cool layer tricks to define the visibility of our second hand markers. Finally, we used some alignment tools to ensure that everything was perfectly center.
Section 5: Creating the Hands of the Watch (37:40)
There are 3 different hands to make for the watch. The minute hand, the second hand, and the hour hand. The minute and hour hand are basically the same thing. We used the Rounded Rectangle Tool to create the shape of those. It's easier to create things in photoshop that are vertical or horizontal. If you want something to be at an angle, create it vertically or horizontally first, then change the angle of it later. We use the Elipse Tool to create a circle in the middle of the watch, then connect all our hands around that circle.
Section 6: Adding a Graphic to the Inner Surface (44:29)
For the grand finale, we add a moon to the inner surface of the watch. This helps give the product a bit of character (and it's just fun to do). We use some blending modes to void the colors we don't want. Then we align the moon in the center of our watch. We adjust the size so it fits perfectly and viola! We have a beautifully rendered apple watch.
Comments
Post a Comment