Learn How to Create and Place a Logo in Perspective in today's episode! This is helpful for photographers and designers alike as you will learn how to transform text as well as place it into an image! Whether you are branding yourself, branding others, or want to place text on a billboard, this episode will come in handy!
Section 1: Creating a Logo (1:20)
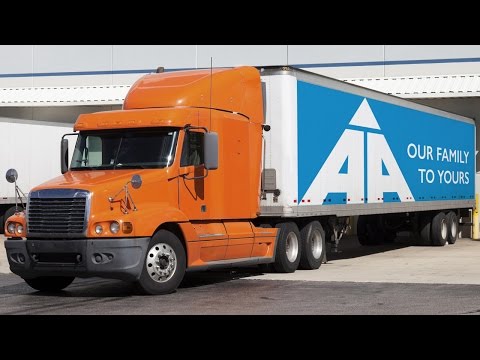
Don’t be afraid to play with text! That means font, weight, color, etc. For this specific logo, we simply used an A and transformed it to be more stylized (Ctrl/Cmd + T). We also copied and flipped it, so that there are two As sitting next to each other. If you are planning on adding any design elements to the logo, be sure to use rulers and other tools like the polygonal lasso tool to guide your shapes into being perfectly straight and symmetrical.
Section 2: Creating a Size Guide (10:36)
Since we are planning on placing the logo onto the side of a truck, it is very helpful to make a general selection of that area first; Use the rectangular marquee tool to create a rectangle that is the size of the truck. Fill that selection with a color and then copy and paste the logo on top of it. Now, it will be very easy to use the alignment tools for precise placement. In this case we choose to align the logo to the bottom left of the rectangle. We then add a slogan to make it more realistic and enticing!
Section 3: Placing the logo in the proper perspective (14:24)
Now that the logo is all prepped and ready to go, group all of those layers together for easier editing. Bring the logo over to the image you will be placing it into.
Tip: Create duplicates of your logo group (Cmd + J) so that you can always have a solid starting place to go back to if needed.
Now, hold Ctrl/Cmd + T and drag the corners of your rectangle to the corners of the area of the sign you will be using (this technique works best for rectangular destinations). Once you have it positioned correctly, changing the blending mode to Multiply will help to blend your logo into the image. Depending on the resolution of your photo, it’s usually a good idea to add a small gaussian blur to you logo to make it seem more realistic.
Section 1: Creating a Logo (1:20)
Don’t be afraid to play with text! That means font, weight, color, etc. For this specific logo, we simply used an A and transformed it to be more stylized (Ctrl/Cmd + T). We also copied and flipped it, so that there are two As sitting next to each other. If you are planning on adding any design elements to the logo, be sure to use rulers and other tools like the polygonal lasso tool to guide your shapes into being perfectly straight and symmetrical.
Section 2: Creating a Size Guide (10:36)
Since we are planning on placing the logo onto the side of a truck, it is very helpful to make a general selection of that area first; Use the rectangular marquee tool to create a rectangle that is the size of the truck. Fill that selection with a color and then copy and paste the logo on top of it. Now, it will be very easy to use the alignment tools for precise placement. In this case we choose to align the logo to the bottom left of the rectangle. We then add a slogan to make it more realistic and enticing!
Section 3: Placing the logo in the proper perspective (14:24)
Now that the logo is all prepped and ready to go, group all of those layers together for easier editing. Bring the logo over to the image you will be placing it into.
Tip: Create duplicates of your logo group (Cmd + J) so that you can always have a solid starting place to go back to if needed.
Now, hold Ctrl/Cmd + T and drag the corners of your rectangle to the corners of the area of the sign you will be using (this technique works best for rectangular destinations). Once you have it positioned correctly, changing the blending mode to Multiply will help to blend your logo into the image. Depending on the resolution of your photo, it’s usually a good idea to add a small gaussian blur to you logo to make it seem more realistic.
Comments
Post a Comment